摘要: 本文主要介绍es 单机版集群搭建。
es 单机版集群搭建
主要配置文件
–elasticsearch.yml es配置文件
–jvm.options jvm相关的配置 内存大小等等
–log4j2.properties 日志系统定义
es 集群 主从
head 插件-web管理器
logstash –数据库与Elasticsearch同步索引
集群搭建
1 安装jdk
2 安装es 将es拷贝3份
3 集群搭建demo、本机测试只需将192.168.35.124换成自己电脑ip即可
1
2
3
4
5
6
7
8
9
10
11
12
13
14
15
16
17
18
19
20
21
22
23
24
25
26
27
28
29
30
31
32
33
34
35
36
37
|
master
cluster.name: notice-application
node.name: master
node.master: true
network.host: 192.168.35.124
http.port: 9200
transport.tcp.port: 9300
discovery.zen.ping.unicast.hosts: ["192.168.35.124:9300","192.168.35.124:9310","192.168.35.124:9320"]
discovery.zen.minimum_master_nodes: 2
slave1
cluster.name: notice-application
node.name: slave1
network.host: 192.168.35.124
http.port: 9210
transport.tcp.port: 9310
discovery.zen.ping.unicast.hosts: ["192.168.35.124:9300","192.168.35.124:9310","192.168.35.124:9320"]
slave2
cluster.name: notice-application
node.name: slave2
network.host: 192.168.35.124
http.port: 9220
transport.tcp.port: 9320
discovery.zen.ping.unicast.hosts: ["192.168.35.124:9300","192.168.35.124:9310","192.168.35.124:9320"]
|
启动master、slave1、slave2 3个节点
浏览器输入 http://192.168.35.124:9200/_cat/nodes?v 查看集群 显示如下:则集群搭建成功
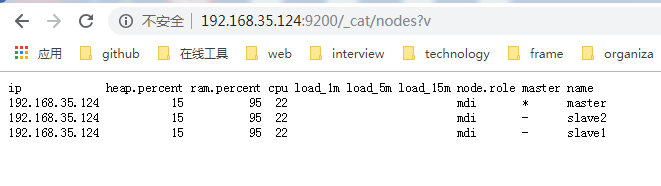
![]()
感谢鼓励